 |
| Cropped and framed photo of a completed page from The Art of Mindfulness: Peace and Calm Colouring |
Many of the photos in the previous post Colouring for Grown Ups were digitally cropped and framed before being uploaded to the blog. I thought it might be useful to provide instructions here for how I did this using a couple of apps on my iPad. Similar apps on an android device would work just as well.
Cropping a digital photo
App used: Free Photo Crop by Big Blue Clip
 |
| Free Photo Crop - from the App Store |

2. Click on the left most icon and choose a photo from the iPad's Photo Library
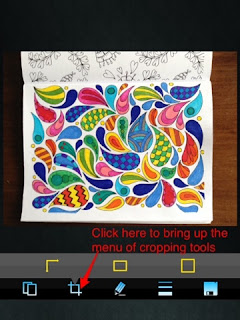
3. Click on the second icon to bring up a choice of tools to crop the photo
4. Drag the handles of the cropping rectangle to choose which areas of the photo are to be cropped
5. Click on the right hand icon (floppy disc?) to save the cropped image as a new photo in to the Photo Library.

3. Click on the second icon to bring up a choice of tools to crop the photo
4. Drag the handles of the cropping rectangle to choose which areas of the photo are to be cropped
5. Click on the right hand icon (floppy disc?) to save the cropped image as a new photo in to the Photo Library.
 |
| Cropped photo |

Framing a digital photo
App used: Pic Collage by Cardinal Blue
1. Open Cardinal Blue's Pic Collage app.

 |
| Pic Collage - from the App Store |
2. Choose to start a new collage by clicking on the bottom half of the screen.


3. Tap anywhere to add a photo.
4. Click on the photo icon to choose photo from the library.


5. Retain the single photo layout.
Using two fingers, straighten and enlarge the image ensuring that enough background is left to provide a wide enough frame.
6. Double click on the image and choose border to add / change the colour of the border.


7. Click on the + icon to open the menu and choose a new background.8. Click on icon in bottom right hand corner to save the whole page including the background as a new photo in the Photo Library.

 9. It is possible to save this image elsewhere but for the purposes of this exercise it is only necessary to have a copy in the Photo album.
10. Open the Clip again follow the earlier instructions to clip the image so that the original photo has an appropriate sized border.

11. As before click on the bottom right hand icon to save this cropped image as a new photo to the Photo Library.
Job done!
 |
| Cropped and framed photo |
I am curious. Do you post your pictures to your blog direct from your iPad and what about your blog entries? I have always found the iPad incredibly frustrating in this respect and ended up sticking to my desktop for blogging denying myself the benefits of portability.
ReplyDeleteI have the Blogger app but when I started I found it frustrating that I couldn't format the page so stuck to writing my posts on my computer. I decided, though, that I wanted to add a watermark to any photos before I upload them and I do this on my iPad so it's much easier to upload photos using the app on the iPad than it is to have to transfer them to the computer and upload from there. I've now started adding most of my text to the draft post via the app but I still do most of the editing and all the formatting on my computer before publishing the post.
Delete